Featured Web Links
Cable ServicesCable Services International
Electric Trace Heating
Cable Services Catalogues
Cable Services Blog
Quick Contact
Cable Services - WrexhamHead Office
Email Link :: Tel 01978 340450 Cable Services - Stone
Email Link :: Tel 01785 825970 Cable Services - Liverpool
Email Link :: Tel 0151 9339022 Cable Services - Swindon
Email Link :: Tel 01793 953399 Smith Electrical - Glasgow
Email Link :: Tel 0141 621 2060
Heating Cable Installation
1.1 Heating Cable Storage
- Store the heating cable in a clean, dry place.
- Temperature range: -40°C to +60°C.
- Protect the heating cable from mechanical damage.
1.2 Pre-Installation Checks
Check materials received:
- Review the heating cable design and compare the list of materials to the catalogue numbers of heating cables and electrical components received to confirm that proper materials are on site. The heater type is printed on its jacket.
- Temperature exposure must not exceed that specified in Raychem product literature. Exceeding these limits will impair product performance. Check that expected exposure is within these limits.
- Ensure that the heating cable voltage rating is suitable for the service voltage available.
- Inspect heating cable and components for in-transit damage. An insulation resistancetest on each reel is recommended.
Check piping to be traced:
- Complete the pipe pressure test.
- Walk the system and plan the routing of the heating cable on the pipe.
- Check pipework against specification drawing. If different consult design authority.
- Inspect piping for burrs, rough surfaces, sharp edges etc which could damage the heater. Smooth off or cover with layers of glass cloth tape or aluminium foil tape.
1.3 Heating Cable Handling
Heating cable handling tips:
- Paint and pipe coatings must be dry to the touch before heating cable installation.
(1) Sharp edges
(2) Excessive pulling force
(3) Kinking and crushing
(4) Walking on it, or running over it with equipment
Heating cable pulling tips:
- Use a reel holder that pays out smoothly with little tension.
- Keep heating cable strung loosely but close to the pipe being traced to avoid interference with supports and equipment.
- Pay out minimum length of heater before fixing to pipe.
- Leave a 0.5m heating cable service loop at all power connection, splice, tee and end seal locations.
- Add additional heating cable to trace the fittings and supports or for spiralling as required by the design specifications, or consult Raychem product literature for design.
- Protect all heating cable ends from moisture, contamination and mechanical damage or other interference if left exposed for long periods of time before component installation.
1.4 Heating Cable Attachment Recommendations
- The heating cable may be installed straight, spiralled or in multiple runs as required by the design specification or Raychem product literature.
- Do not use metal attachments, vinyl electrical tape or duct tape as heating cable damage may result.
- Plastic cable ties must have a temperature rating that matches the system exposure temperature.
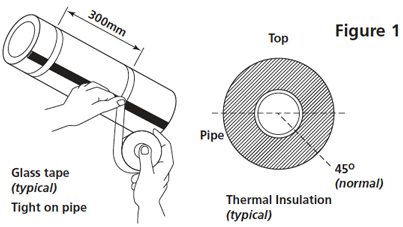
- Fix in place with glass cloth tape (see figure 1) at 300mm intervals and additionally where necessary.
1.4.1 Straight Tracing
- Straight trace the pipe unless the design call for spiralling (see 1.4.2).
- On horizontal pipes fix on lower quadrant as shown in figure 1 and not on bottom of pipe.
- Thermally insulate and weatherproof to specification.
Raychem Attachment Tapes
- GT-66 Fibreglass Tape
General purpose tape - GS-54 Fibreglass Tape
Recommended for use on stainless-steel surfaces and lower temperature installations as specified in Raychem product catalogue. - AT-180 Aluminium Tape
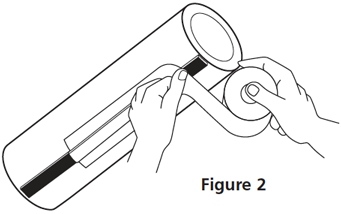
Use only if the design requires it. AT-180 improves the heat transfer and increases the power output of the heating cable. Attach the heating cable to the pipe as shown in figure 2.
1.4.2 Spiral Tracing
- Alternative spiralling methods are shown in figures 2a and 2b.
- Only spiral heater on pipe when called for by design.
Figure 2a
- Heater cable length:
- pipe length x spiral ratio. - Refer to design spec for spiral ratio.
Step 1 - Make starting loop as shown
Step 2 - Grasp loop and wind around pipe
Step 3 - Space evenly and attach pipe - Thermally insulate and weatherproof to specification.
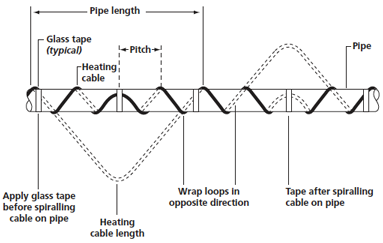
Figure 2b
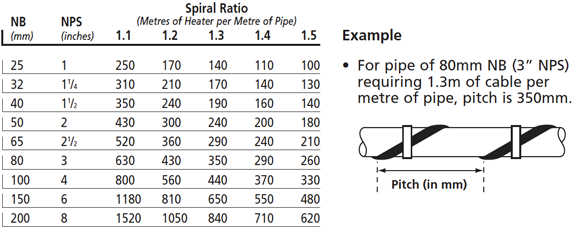
- Refer to design specification for spiral pitch.
- Mark the pipe at the spiral pitch or use a simple length gauge.
- Fix the heater as installation progresses.
- Thermally insulate and weatherproof to specification.

Spiral Pitch Chart
1.5 Cutting The Heating Cable
- Cut the heating cable to length after it is attached to the pipe.
Before cutting it, confirm the tracing allowance as per Sections 1.3 and 1.6. - Self-regulating cable can be cut to length without affecting the heat output per metre.
1.6 Typical Installation Details
- Typical installation details for fixing heater to pipe fittings are shown below and across.
General Notes:
- Trace pipe fittings as shown to allow easy maintenance.
- Consult the design specification or Raychem product literature for the tracing requirements for fittings and support.
1.6.1 Valve
- Refer to design specification for loop length.
- Fix with glass cloth tape.
- Thermally insulate and weatherproof to specification (including valve stem).
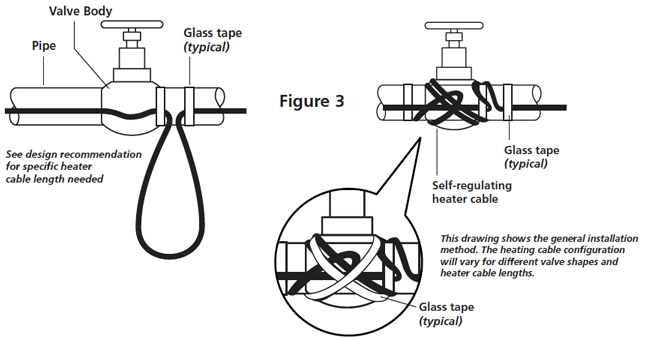
1.6.2 Elbow
- Fix heater to outside (long) radius of elbow.
- Fix with glass cloth tape.
- Thermally insulate and weatherproof to specification.
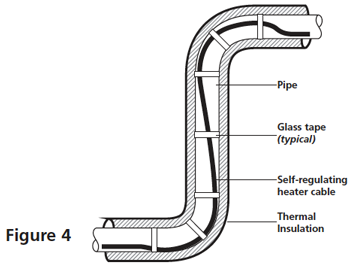
1.6.3 Flange
- Additional heating cable is 2 times diameter of pipe.
- Fix with glass cloth tape.
- Thermally insulate and weatherproof to specification.
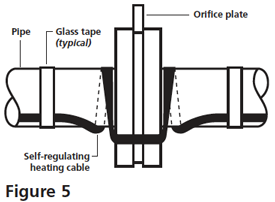
1.6.4 Pipe Bar Hanger
- Do not clamp heating cable with support. Heater must be over the support.
- No additional heating cable is required for bar or rod pipe hangers.
- Fix with glass cloth tape.
- Thermally insulate and weatherproof to specification.
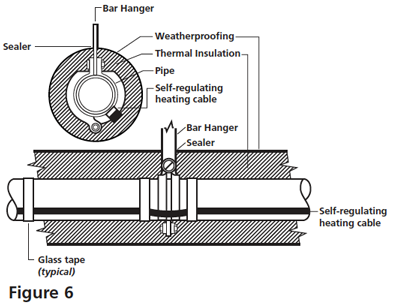
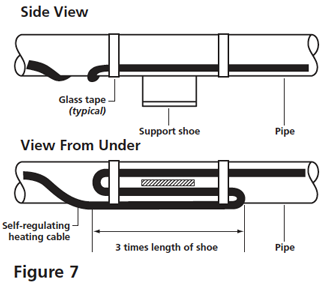
1.6.5 Pipe Support Shoe
- Fix with glass cloth tape.
- Thermally insulate and weatherproof to specification.
Links
Cable Services web link: Electric Trace Heating Cable
Cable Services Catalogue PDF: Trace Heating Installation Guide


 Copyright ©
Cable Services Holdings Limited |